One of the most important features of any camera is its shutter speed. It is the element that lets you control the amount of time the camera’s sensor is exposed to light, which in turn controls the amount of movement that is captured in your photos. Understanding how to master the art of camera shutter speed is essential for any photographer, whether you are a professional or just starting out. In this comprehensive guide, we will explore the different types of shutter speed, how they impact your photos, and how to adjust them to achieve the desired effect. By the end of this guide, you will be equipped with all the knowledge you need to take your photography skills to the next level and capture stunning photos with ease. Let’s get started!
Understanding the basics: What is shutter speed?
Shutter speed is a fundamental concept in photography that determines the duration for which the camera’s shutter remains open, allowing light to enter and expose the camera’s image sensor. It plays a crucial role in capturing and controlling motion, as well as in creating various artistic effects.
In simple terms, shutter speed refers to the amount of time the camera’s shutter is open, measured in fractions of a second. It can range from very fast shutter speeds like 1/4000th of a second (which allows for freezing action) to slow shutter speeds like 1 second (which allows for capturing long exposures).
Understanding the concept of shutter speed is vital because it directly affects the outcome of your photographs. A faster shutter speed freezes motion, making it ideal for capturing fast-moving subjects like sports or wildlife photography. On the other hand, a slower shutter speed introduces motion blur and can be used creatively to convey a sense of movement or capture light trails in nighttime photography.
Moreover, shutter speed also interacts with other exposure settings like aperture and ISO to achieve a well-balanced exposure. By adjusting the shutter speed, you can control the amount of light entering the camera, which is especially useful in different lighting conditions.
How does shutter speed affect your photos?
Shutter speed refers to the length of time the camera’s shutter remains open, allowing light to enter and expose the camera sensor. It determines the amount of motion blur captured in an image and greatly influences the overall look and feel of a photograph.

The primary effect of shutter speed is freezing or blurring motion. A fast shutter speed, such as 1/1000th of a second, freezes action, making it ideal for capturing fast-moving subjects like sports, wildlife, or a speeding car. On the other hand, a slow shutter speed, such as 1/30th of a second, introduces motion blur, which can add a sense of dynamism and creativity to your shots. This technique is often used for capturing flowing water, light trails, or creating a sense of movement in a bustling street scene.
In addition to motion blur, shutter speed also affects exposure. The longer the shutter remains open, the more light will be captured, resulting in a brighter image. Conversely, a shorter shutter speed reduces the amount of light reaching the sensor, leading to a darker image. Understanding the relationship between shutter speed, aperture, and ISO is crucial in achieving a well-exposed photograph.
Experimenting with different shutter speeds can yield fascinating results. By adjusting the shutter speed, you can capture a waterfall as a silky smooth cascade or freeze the droplets in mid-air. You can convey a sense of speed and energy by blurring the wheels of a moving car or freeze a bird in flight with razor-sharp detail.
The relationship between shutter speed, aperture, and ISO
Understanding the relationship between shutter speed, aperture, and ISO is crucial for mastering the art of photography. These three elements work together to control the exposure of an image and can greatly influence the final outcome.
Shutter speed refers to the length of time that the camera’s shutter remains open to allow light to enter and hit the camera sensor. It is measured in fractions of a second, ranging from very fast speeds like 1/2000s to slower speeds like 1/30s or even longer. The choice of shutter speed determines how motion is captured in a photograph. A faster shutter speed freezes fast-moving subjects, while a slower shutter speed allows for motion blur, creating a sense of movement.
Aperture, on the other hand, refers to the size of the opening in the lens that allows light to pass through. It is measured in f-stops, represented by numbers such as f/2.8, f/5.6, or f/16. The aperture affects the depth of field, which is the range of distance in a photo that appears to be in sharp focus. A wider aperture (smaller f-number) creates a shallow depth of field, where the subject is in focus while the background is blurred. Conversely, a narrower aperture (larger f-number) increases the depth of field, resulting in a larger area in focus from the foreground to the background.
ISO refers to the sensitivity of the camera sensor to light. It is represented by numbers such as ISO 100, ISO 400, or ISO 3200. A lower ISO value is ideal for capturing well-lit scenes, whereas a higher ISO is required in low-light conditions. However, increasing the ISO also introduces digital noise or graininess in the image, so finding the right balance is essential.
The three main types of shutter speed: fast, slow, and long exposure
Fast shutter speed is typically used to freeze motion. It allows for capturing fast-moving subjects with sharp details. This is ideal for sports photography, wildlife photography, or any situation where you want to capture a precise moment in time. With a fast shutter speed, such as 1/1000th of a second or higher, you can freeze a bird mid-flight or capture a cyclist in action, showcasing their speed and agility.
On the other hand, slow shutter speed is used to intentionally blur motion. This technique can create a sense of movement or convey a feeling of dynamism in your images. By using a slow shutter speed, like 1/15th of a second or slower, you can capture flowing water as a smooth, silky texture or create light trails from moving vehicles at night.
Long exposure takes slow shutter speed to the extreme, often lasting several seconds or even minutes. This technique is commonly used in night photography or to capture stunning light painting images. By keeping the shutter open for an extended period, you can capture the movement of stars in the night sky, create mesmerizing light streaks from traffic, or even make people disappear from a crowded scene.
How to freeze motion with high shutter speed?
Capturing motion is an essential skill for any photographer, and mastering the art of freezing motion with a high shutter speed can take your photography to the next level. Whether you’re shooting fast-paced sports events, wildlife in action, or simply want to capture a split-second moment, understanding how to use a high shutter speed effectively is crucial.

When it comes to freezing motion, the key is selecting a shutter speed that is fast enough to capture the subject in sharp detail. Generally, a shutter speed of 1/500th of a second or faster is recommended for freezing most types of motion.
To achieve a high shutter speed, you’ll need to adjust your camera settings accordingly. Start by switching your camera to manual or shutter priority mode, as this will give you full control over the shutter speed. Then, set your ISO to a lower value like 100 or 200 to minimize noise in your images.
Next, depending on the lighting conditions, you may need to open up your aperture to allow more light into the camera. This will help maintain a faster shutter speed without underexposing your image. Experiment with different aperture settings, keeping in mind that a wider aperture (lower f-stop number) will result in a shallower depth of field.
Once you have your camera settings dialed in, it’s time to focus on your subject. Anticipate the moment you want to freeze and be ready to press the shutter release at the right time. Timing is crucial, especially for fast-moving subjects, so practice and patience are key.
Keep in mind that the speed at which you need to freeze motion can vary depending on the subject and the direction of movement. For example, capturing a cyclist moving towards you will require a faster shutter speed compared to a bird flying across the frame.
Experiment with different shutter speeds and techniques to find what works best for your specific photography style and subject. Remember that freezing motion is not just about capturing a crisp image; it’s about conveying a sense of energy and excitement in your photographs.
Creating motion blur with slow shutter speed
One fascinating aspect that photographers can explore with camera shutter speed is the ability to create captivating motion blur effects. By intentionally slowing down the shutter speed, photographers can capture the essence of movement in a still image, resulting in visually dynamic and engaging photographs.

When using a slow shutter speed, objects in motion appear blurred, while stationary elements remain sharp. This technique is particularly useful when photographing subjects such as flowing water, moving vehicles, or people engaged in activities that involve motion.
To achieve this effect, start by setting your camera to a shutter speed of around 1/30th of a second or slower. It’s important to note that the actual shutter speed required will depend on the specific subject and the desired effect. Experimentation is key, so don’t be afraid to try different settings and adjust accordingly.
To maintain sharpness in your image while creating motion blur, it’s crucial to stabilize your camera. Using a tripod or resting your camera on a stable surface will help reduce camera shake and ensure that the stationary elements remain crisp and clear.
When photographing moving subjects, such as a flowing river or a passing car, it’s essential to frame your shot in a way that allows the motion to be clearly captured. Consider the direction of the movement and position yourself accordingly. Experimenting with different angles and perspectives can lead to stunning results.
Another technique to enhance motion blur is panning. This involves tracking a moving subject with your camera while using a slow shutter speed. By following the subject’s movement, you can create a sharp subject against a blurred background, emphasizing the sense of speed and motion.
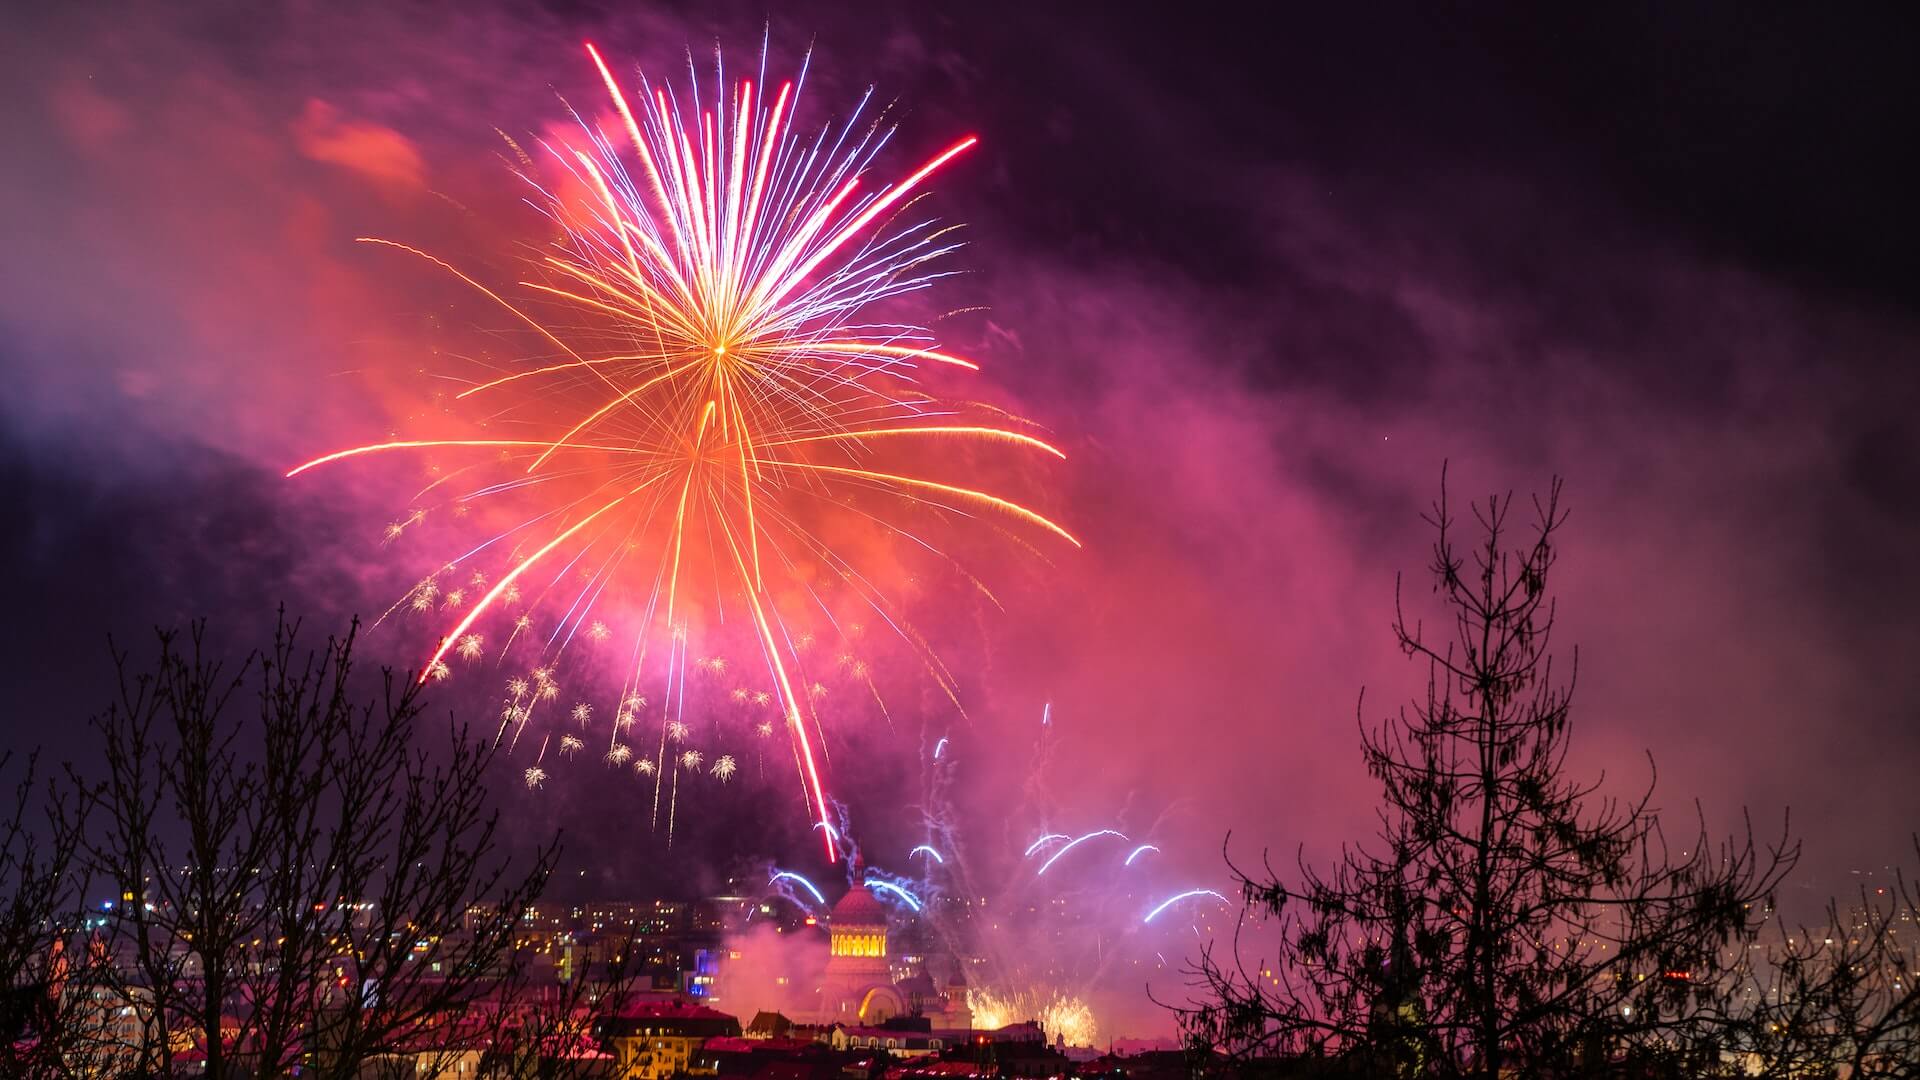
Capturing light trails and star trails with long exposure
Capturing light trails and star trails with long exposure is a fascinating technique that can add a touch of magic to your photographs. Whether you’re shooting in a bustling city or under a clear night sky, mastering this technique will allow you to create stunning images that showcase the movement and beauty of light.

To capture light trails, you’ll need to use a long shutter speed, typically ranging from a few seconds to several minutes. This extended exposure time allows your camera to record the path of moving lights, such as car headlights or city lights, as streaks across the frame. The longer the shutter remains open, the longer the light trails will appear.
To achieve this effect, it’s crucial to stabilize your camera on a tripod or other stable surface to prevent any unwanted camera shake. Additionally, using a remote shutter release or the camera’s timer function can further eliminate any potential blurriness caused by pressing the shutter button.
When photographing star trails, the principle is similar, but the subjects are the distant stars in the night sky. By using a very long exposure time, often ranging from a few minutes to several hours, you can capture the mesmerizing movement of the stars as they appear to rotate around the Earth. This technique requires patience and careful planning, as you’ll need to find a location away from light pollution and ensure a clear sky.
Experimenting with different exposure times and compositions can yield unique and captivating results. While longer exposures usually produce more pronounced trails, shorter exposures can also create interesting effects, particularly when combined with other elements in the frame, such as stationary objects or light sources.
Conclusion
Understanding and effectively utilizing shutter speed is crucial in capturing stunning and creative images. Remember to experiment with different settings and practice regularly to improve your skills and unleash your creativity. With the knowledge gained from this guide, you’ll be able to confidently capture moments with the perfect shutter speed, resulting in breathtaking photographs. Happy shooting!